September 26, 2006
Spike - Part 1
 Over the weekend, I started on another NXT robot from the instructions included in the software. Say "hi" to Spike, the slightly disabled scorpion (I think). This is a the base - I haven't worked on the tail yet. The pinchers don't do anything, as they are fixed in the closed position, which is a bit disappointing. I can imagine Lego was a little worried about lawsuits when Spike might grab a kid's finger or something.
Anyway, it does crawl well on it's six legs. But these are not the legs obvious in the picture. Those are for show. The real crawling is done by smaller legs that are not so obvious. Look at the gray liftarm attached to a white liftarms. That's a leg.
The tail is next, and this robot promises to use the sound sensor, which I'm looking forward to trying out...
September 22, 2006
Ball Elevator - Part 2
 Continued on with the Ball Elevator grand contraption last night. As you can see, I have made some progress.
A motor has been attached to propel the elevator. For the moment it's just attached to a battery box - a rather convenient device. At some point I might need to control it all with an RCX, but I don't have a reason to use one at the moment.
At right is a close-up of the upper landing area for the balls. Catching the balls after being thrown by the little lift chairs is rather difficult.
 Anything that will catch the balls will likely get in the way of the chairs. After many attempts at something that would reliably, and if possible, elegantly catch the elevated balls, the result was very much like the hopper at the bottom. It's essentially three liftarms in parallel, with the one in the middle one stud lower then the outside ones. Some 2L thin liftarms (light blue) hold the two levels together. The middle liftarm sticks out a little closer to the chain. When the chair goes by, it fits between the two liftarms that make the chair. It took lots of placement adjustment to get that to work correctly.
 When the ball hits the end of this first ramp, it takes a right turn onto another ramp composed (for the moment, at least) of two longer liftarms.
The last pictures is a bad action shot. A blurry ball is making it's way down the longer ramp. Someday I'll make a setup for taking pictures with better lighter for faster shutter speeds. Or I could take the pictures during daylight. What a concept!
September 21, 2006
Ball Elevator - Part 1

Haven't had too much building time the past few days, but I took a break from NXT learning to work on a ball elevator. I recently saw Philo's wonderful contraption, and from it, I stole the basis of the mechanism for lifting lego soccer balls.
I figured that with this idea, lifting the balls would be easy, but it was still a lot of work to get it working at all, and then to get it working consistently.
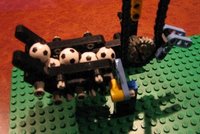
 At right is a picture of the bottom of the elevator set to pick up the next soccer ball. Sorry the pictures aren't the greatest - I wanted to avoid using a flash and getting reflections and white spots. The chain is made of these, with a few of these interspersed. Note the blue liftarm. It keeps the balls from all rolling off when their is no "chair" ready to pick up a ball.
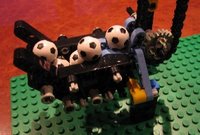
 Now a ball has been lifted. The stopper liftarm is lifted by the chair as it goes by. Getting that stopper mechanism working took five or ten attempts. The hard part is stopping the balls with something that doesn't hit the chain, or stop the chair's movement.
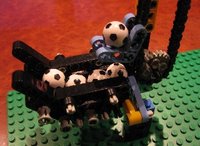
 Now, at left, the ball has been lifted a bit, and the stopper liftarm will fall back into place just in time before the balls roll off onto the baseplate.
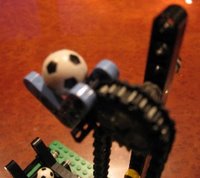
 Finally, here is a picture of a ball at the top of the elevator, just about ready to go over the top, and onto ... something that I haven't built yet! I think what I'm trying to build is called a Gravitron, but I can't find a good picture of one (not the amusement park ride - the thing they have in science museums).
September 20, 2006
Connector Converters? Extra Sensors? Rechargeable Battery
Questions for those who've got an NXT...
1) Have you tried the converters to use the old RCX sensors with the NXT? Do they work well? Do they work with the standard NXT programming system? Sounds like you need the educational version, and people are hoping that the retail software will get an update to allow it. Sigh...
2) If you had to buy one extra sensor for you NXT set, which one would it be?
3) Do you have the rechargeable battery and adapter? If so, is it worth the $73?
September 17, 2006
NXT Tribot Grabber


I went on to the next Getting Started step for the NXT tonight - the Grabber for the Tribot.
Builder is fairly straightforward, and the programming is to at this point.
But it didn't work. It tried to grab, but it couldn't hold the big blue ball. A little disappointing, but life goes on...
Well, I did finally figure out how to add pictures, so you can see the robot with the grabber, and its attempt to pick up the ball.
September 14, 2006
Added Bumper to Tribot
Last night I continued on with the getting started robot by
adding the bumper with the touch sensor. The bumer is a bit
bulky, but it does work pretty reliably. It's the first sensor
you add while building the Tribot. Interesting bumper design,
using a small gear to connect with the button of the sensor.
Want to add some pictures, but still getting used to my new
computer, so that will have to wait...
Programming is easy - adding one more block to the two I had
to move the robot forward, then back. It's essentially a "Wait Until"
block of old, but you wouldn't know that from looking at the block.
Maybe over time I'll get used to reading the programs by looking
at the blocks.
September 13, 2006
NXT Part Lists
Ah... Looks like the Mindstorms NXT (8527) parts list, with pictures, is already on Peeron.
NXT Parts List
Many of you, it seems, find this blog by searching for "NXT parts list".
Please add a short comment if you would like me to post the complete parts list
for the new NXT set (#8527).
Please add a short comment if you would like me to post the complete parts list
for the new NXT set (#8527).
September 11, 2006
USB Bluetooth Dongle
I should mention that the device I got was a Cables Unlimited USB-1530.
The USB-1520 is listed on a site as compatible with NXT, but it doesn't
say anything about the 1530. The only difference, supposedly, is the "class,"
that is, how far away you can communicate with the connected device.
the 1530 is Class 1 for 100m.
The USB-1520 is listed on a site as compatible with NXT, but it doesn't
say anything about the 1530. The only difference, supposedly, is the "class,"
that is, how far away you can communicate with the connected device.
the 1530 is Class 1 for 100m.
More attempts to connect to the NXT via Bluetooth
Partial success. Only had a little time tonight to play with the NXT.
Worked on getting Bluetooth communicating.
I uninstalled the driver that came with the dongle, and had Windows (XP)
install its own. That didn't help in itself. Going to the NXT window in the
Mindstorms software and doing a Scan, nothing connected.
Then I ran the Bluetooth application that came with the dongle,
and had it search for devices. Now it saw the NXT! It said
"NXT"! Many happinesses! On the NXT, it showed me the four-digit
passcode, which I entered in the application. It now showed an icon
for "NXT". More happinesses!
So I went back to the NXT window and tried Scan again.
After it's usual long delay, nothing.
Will try more soon...
September 10, 2006
I got an NXT!!
Finally got an NXT today! Went to the Lego Store, which was a madhouse because of a promotion they were doing in the mall. The person ahead of me at the cash register was also getting one. They didn't have the (expensive) rechargeable batteries in stock, and they don't carry the adapter (very weird - how do you charge the battery without an adapter?). But I walked away happily with my NXT.
Home later, I opened the box, which is a bit hokey. You have to tear the box flaps along a curve to get it open. One of the smaller boxes inside says "start here" but you really need to open many of the other boxes and at least three of the part bags.
The first model is the "TriBot" which isn't too hard to build. It is made with all three motors that hook together next to each other, but strangely, only two of them are actually used. The new phone pluggey wires are a bit bulky, and the ones they tell you to use (they come in three lengths, I think) are a little too long, and you have to figure out how to stuff them in so they don't trail behind the bot.
From here, things got a little confusing. First I tried programming the bot to the Quick Start instructions. These are not videos that take you step by step like for the old Mindstorms. They are step by step, but they don't always show you how you are supposed to accomplish a step, so it takes some hunting and guessing. After ten minutes or so I had the two-step program done.
I'd bought a USB Bluetooth dongle today, so I thought I'd try to use that to download the program to the NXT, instead of the USB cable that is included. There is no IR tower with the NXT. You use either USB or Bluetooth. After half an hour I gave up on Bluetooth without successfully connecting to the NXT. Very frustrating. Maybe I got a dongle that is not compatible. That would be an annoying waste of 25 dollars. So I switched to USB and that worked after a try or two.
The program just goes forward a couple feet on the test pad (which is a little nicer material than the old ones) and then goes bad. The instructions tell you to place one of the large balls on a certain spot, and they lead you to believe it's stopping when it gets to the ball, but it's really just going a certain distance (wheel rotations or time - not sure which) and then reversing.
One very frustrating part of the software (which installed very easily) was the NXT window that shows you connected NXT's (via either method). This would often lock up, sometimes for a few minutes at a time. Modern software should not do this.
All in all, there is good and bad for a first day's experience. I'm hoping for more consistent good news on further investigations.
September 06, 2006
Getting an NXT soon!
I hope to have an NXT set within two weeks.
I'll try to post more often once I get it, and get
time to try it out.
Any suggestions on accessories to get?
Or Bluetooth dongles for my new PC? Do I even need one?
I'll try to post more often once I get it, and get
time to try it out.
Any suggestions on accessories to get?
Or Bluetooth dongles for my new PC? Do I even need one?