December 14, 2011
Update on Die Rolling and Random Numbers
Unless Lego has fixed this in a newer version of the firmware, the way to work around the problem I mention in a post below is to have an initial part of your program loop. In the loop, generate a random number. Stop the loop when the user presses a button. The user will take varying amounts of time which will cause the next random number generate (after the loop is complete) to be more random.
2011 FLL Results
I coached an FLL team for the fourth year. This time, it was back to a private team, after last year's team at a junior high school. Five kids, which was a nice size, and a nice group.
It was a hard year for the robot missions. They struggled with consistency. The last week they had a couple 134 point runs, but at the tournmanent their top score was only 119. They valiantly tried to get the thermometer mission working at the tournament, but didn't quite get it completed.
As I have time, I'm going to try my hand at this year's robot game. I don't have any illusions that it will be easy!
September 25, 2011
Old vs New NXT Rechargeable Batters
I'm coaching an FLL team for the fourth straight year and decided to get a second rechargeable battery for the spare NXT. I figured I could use the adapter I had from the rechargeable battery I purchased a few years ago. Nope. They have changed from AC to DC adapters a year or two ago. So I had to purchase a new adapter, and have to have two around instead of one.
Labels: NXT battery
November 20, 2009
First Lego League, etc.
Sorry this blog has been quiet the last year. I am coaching another FLL team this fall, and also starting a graphic design business. Discounted rates for work booked through the end of January, 2010 to anyone in the US involved with FLL! See the website for examples of my work and more information.
October 08, 2008
First Lego League
I'm still here. I've started coaching a First Lego League team for the first time. Quite fun, but a lot of work! When done with that in December, maybe I'll have time for some new posts.
April 17, 2008
Building Again!
I started working on the walking robots. The instructions are in the software that comes with the NXT. Finished the first "walk" part the other night. Mostly went well. A few of the steps where you connect liftarms to the motors are a bit tricky, as is the precise location to insert the axles. I'll try to post some pictures to clarify these steps when I get some time...
February 12, 2007
Robot Challenge No. 1 - Results and My Solution
Well, I've been very busy preparing my robot for the science fair it was for. The demonstration was last Friday, and after an initial period of setup that lasted too long, it was a success. My robot wrote kids' initials (usually one or two letters) about 50 times during a two-hour period complete with two battery changes.
My robot uses three motors, for X-axis, Y-axis and pen control (up and down). The whole robot moves like a car (with a long side-car) along the X-axis. At first it passes by a Lego wall that held a strip of paper with 26 bubbles. Each bubble had a different letter on it. Fill in the letter you want drawn, and a light sensor determines which bubble is filled in, and converts that to a number from 1 to 26. At the beginning of the strip is an alignment start mark. At the other end of the strip, past Z, is and end mark. The end mark can be narrow or wide. Narrow means to back up and wait for another strip that indicates the second letter to draw. The last letter is indicated on a strip with a wide mark.
When the last letter is read, the robot moves a little further down and starts writing on a piece of paper (or on the table, um, if there is no paper). Up to five letters can be drawn, though it is difficult to correctly read that many letters and end marks. I have done successfully that once.
The X- and Y-axis motion is controlled with two rotation sensor hooked up to the RCX. This makes it sound easy to go exactly where want to draw, but it isn't that easy! It took me two weeks of work on many evenings to get the program close to working perfectly. You must slow down the motors as you approach an ending position, or the motors will cruise past.
The programming is in NQC. The program is about 775 lines long, and compiles to about 6000 bytes, which almost fills the RCX's memory! When combined with a calibration program, and two programs to change the calibration manually up or down, there are only 10 bytes left!
As you can see from this movie (11M), it is now working pretty well. It can draw all 26 letters, and does an OK job on the diagonals. I'll try to post some other pictures and information when I have more time. Some slightly out-of-date pictures are in the gallery here.
As for the contest, I think I'll declare Mark the winner as I think he was the only one who submitted an entry on time that was made solely for this competition. Congratulations! That and a quarter will get you a cup of coffee (back in 1975, perhaps).
January 17, 2007
Open Thread
Sorry - been busy still, so no time for posts. No, I haven't forgotten the deadline that passed on the first challenge. I'll try to post on that soon. Suggestions for the next challenge are always welcome.
Please post a comment about what information is hard to find out for the NXT, or anything other robotics topics you'd like to talk about.
Please post a comment about what information is hard to find out for the NXT, or anything other robotics topics you'd like to talk about.
January 04, 2007
Bluetooth poll
And another poll on NXTasy about Bluetooth (working or not?)...
http://forums.nxtasy.org/index.php?showtopic=723
Please vote on both polls.
http://forums.nxtasy.org/index.php?showtopic=723
Please vote on both polls.
January 03, 2007
Poll - NXT background and purchase
I set up a poll on the NXTasy forums:
http://forums.nxtasy.org/index.php?showtopic=717
You might have to register, but I'd highly recommend the site.
I encourage all readers to answer the poll.
Sorry about the absence of NXT Tip posting. Will try to put some more up
as soon as I have time...
http://forums.nxtasy.org/index.php?showtopic=717
You might have to register, but I'd highly recommend the site.
I encourage all readers to answer the poll.
Sorry about the absence of NXT Tip posting. Will try to put some more up
as soon as I have time...
December 29, 2006
NXT Tip of the Day #3 - Using the Touch Sensor
Today you decide you want to do different things depending on whether the touch sensor is pressed or not. The touch sensor is a button, and your NXT-G program can make decisions depending on which state it is in.
To do this, you would use a Switch Block. By default, it is set up to make a decision using the touch sensor, but it has many other uses.
 When you add a Switch Block, a box shows up in your program with the "switch"part on the left. Inside the box are two sequence beams, instead of the usual one. The blocks (you have to add them, of course) on the top beams are only run if the switch condition is "true". The bottom is run for "false".
The condition is indicated by the choices in the panel at bottom-left. Check that the Port is the one you have wired the sensor to, and change it if necessary. Everything else should be already set correctly for this use.
In the example to the right, you are running a car with motors connected to ports B and C. If the touch sensor is pressed when it gets to this part of the program, it will run forward for 2 seconds. If not, it will go backwards for 2 seconds. If this was the complete program, you would have to press the button as the program is started to have the car go forward.
December 28, 2006
NXT Random Number Generator
 It's official. The NXT's random number generator is not very good.
The first test was with my Die Rolling Program. I noticed tonight while showing it off that the first ten rolls or so were all even numbers. Then the next five or so were all odd numbers.
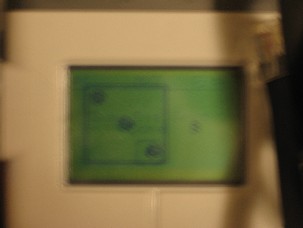
So then I saw a comment somewhere about testing randomness but choosing two numbers and plotting a point at the X, Y location on the display. Do that a few thousand times. If you see a pattern, the random number generator is not very random.
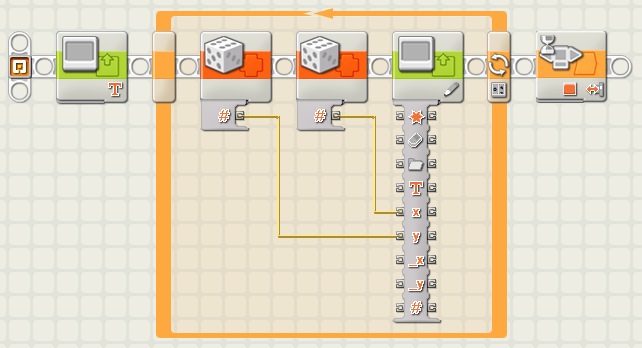 Well, it only takes five blocks to write such a test. And the results are not good for the NXT random number generator. The display ends up looking like a grid of squares, instead of filling up randomly and (eventually) completely.
Has anyone found a way to improve the randomness of the Random Number block?
Tip of the Day #2 - Multiple Display Blocks
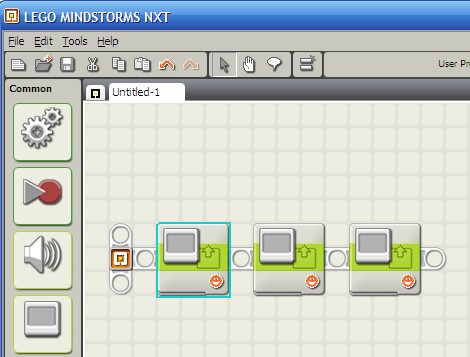 When you want to draw a number of things on the NXT display, you use more than one Display block, as shown at right.
Each one has settings (computer folks often call these "parameters") that determine what is drawn on the display. These are shown at the bottom-left of the NXT programming application. You can draw images (pictures), text, or drawing, such as lines and circles.
So you strings a number of Display blocks together to make something interesting or useful on the NXT display, download it, and run it. Only the last of your Display blocks worked!
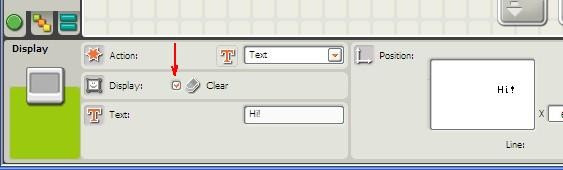 What happened? One of the parameters is a check box labeled "Clear". If this is checked, then the display is cleared before that drawing operation is performed. By default (i. e., if you don't change any of the parameters), this check box is checked. So if you have three Display blocks, as shown in the top picture, all three will clear the NXT display, and only the last drawing operation will be visible!
So click on the "Clear" check box if you already have drawings on the NXT display, and only want to add more, not start over.
December 27, 2006
Die Rolling Program
 I finished my first complex NXT programming project tonight. I wrote it with NXT-G -- the programming environment that comes with the NXT.
It rolls a die randomly, and draws it on the screen, as you can (sort of) see in the picture to the right.
The main program ("Draw Die Test") just chooses a random number from 1 to 6, and then calls a "My Block" called "Draw Die" to (drumroll, please) draw the die. This is the most complex code because there are seven different "spot" position that make up the various die drawings. I actually pretend like there are nine, not seven, so I can do computations assuming a three-by-three grid, numbered from zero to eight. Spots one and seven are never used.
Not quite as complicated, but still using a number of math functions is the "Draw Die Spot" block. It draws just one little circle, in one of the nine positions.
Finally, there is no built-in modulo division function (% to C-language programmers), so I had to
You can dowload the program here. If you have any questions, please post a comment.
Update: As of 1/8/08, the folder is still not public on BrickShelf.
You can download the four necessary programs here, here, here and here!
New NXT Color Sensor from Lego (and HiTechnic)
Lego is selling a color sensor for use with the NXT. It was designed by the HiTechnic company. It will ship in a few weeks. When someone gets one, please leave a comment to let everyone know how it works! The 0-17 color chart looks odd to me, but you do have access to the RGB (red, green, blue) values. Using all of those in NXT-G would be interesting. I'll need to get a bigger monitor for my programs. :)
It is available on the Lego site, and programming and other information is
on the HiTechnic site.
There is also a compass sensor available. More information here.
It is available on the Lego site, and programming and other information is
on the HiTechnic site.
There is also a compass sensor available. More information here.
NXT Tip of the Day - Want more of these? Leave comments...
I can see that there are many new readers to this blog, what with
holiday presents, so I will start ...
The NXT Tip of the Day
which may be more like
The NXT Tip of the Week or The NXT Tip of the Month depending on how much time and how many ideas I have. Please leave comments to encourage me, and suggest ideas you are interested in.
So here is Tip #1: In NXT-G (the graphical programming environment that comes with the NXT, save your program often! Don't wait until you've spent three hours getting all your blocks just right and have tested your program ten times. Save your program ever few blocks you add. This is especially true if you use advanced techniques like connecting wires (on the screen wires, not the black wires you use to connect to motors and sensors) or MyBlocks.
In fact, if you have a complicated program, I would suggest saving to two different file names, keeping one as a backup in case something goes wrong. Anyway who hits the "broken wires" bug will thank me.
December 09, 2006
Robot Challenge Number 1
If the NXTasy blog can do it, so can I! :)
I'm just starting to work on a project for a science fair demonstration (adults make them at the school in question), and thought I'd make it into a challenge.
Make a robot that can write one or more letters on paper. The letter or letters should be chosen somehow by the user, and not be fixed in the program or entered via a PC keyboard. That is, you should be able to take the robot somewhere without a computer and use it.
The official rules are as follows, but it's not an easy task, so you modify the goal for yourself to fit your experience level. Please enter even if you don't finish your robot - let all see what you tried to do!
1) To enter, you must post a movie of your robot performing the goal (or trying!) somewhere by midnight (local time) on January 9, 2007. In the movie, you should say "Robot Challenge Number 1" and your name (or a fake name if you prefer). You must post a comment to this blog entry with a description of your robot, and a link to your movie.
2) You can use one RCX or one NXT.
3) All parts must be official Lego, except you can use a pen or pencil, and some paper.
4) Once the program starts, it must not communicate with a PC, and cannot be controlled by a remote.
5) The program should not know what letter or letters it is to write until the user instructs the robot after the program has started.
6) There is no prize except for the glory of winning and having fun.
Go!
Old Mindstorms (RIS) Software on Win XP - USB Tower Lockup - Patch
Last night I started working on a project for the old Mindstorms kit with the RCX. I got a new PC a couple months ago, and this is the first time I've installed the old RIS software on it and tried to use the USB IR tower. When I connected the tower, it locked up my PC.
After some searching, I found there is a driver patch to fix this. Lego has information on this here. If you want to jump straight to getting the patch for English, click here. Other languages are available - see the first link I have above for those.
Yippee... No lockup!
After some searching, I found there is a driver patch to fix this. Lego has information on this here. If you want to jump straight to getting the patch for English, click here. Other languages are available - see the first link I have above for those.
Yippee... No lockup!
December 07, 2006
NXT Tutorial
Just found these tutorials tonight. I'm only now
watching the very first one now, but it looks promising.
Post a comment if you find them helpful (or not)...
watching the very first one now, but it looks promising.
Post a comment if you find them helpful (or not)...
December 04, 2006
Tricycle - My first homemade robot
 After a couple months with the new NXT kit, I finally made a robot of my own design tonight.
It's not much. Just a simple tricycle, not too different from the Tribot.
The motors are quite large, so it takes some experimenting to attach them. After using L-liftarms to connect to the NXT, it was quite unstable. So I secured the motors to each other at front and back. It's not perfect, but now it's pretty stable.
 At the front is a caster made with a pulley. It needs a little improvement, but I threw the whole thing together pretty quickly.
One annoyance is the new wires. The NXT only comes with one of the shortest lengths, which is more than long enough for this robot.
I wrote a simple test program. It has a loop that executes three times. In it are six motor
 control blocks. The sequence makes it go straight for a bit, then a little turn, etc. Fun to watch, though I was hoping it would annoy the cats a little more. Must download a barking sound to it.
Here's a picture from the bottom.
All in all fairly successful as a platform to add things too, I think, and simple to build. If enough people beg nicely, I'll think about generating building instructions for it, though it probably doesn't add much over the TriBot design.
November 29, 2006
NXTasy Challenge No. 1
It's a bit late to design and build a solution, but
for future reference, take a look at the first
NXTasy challenge.
A good challenge, and the author obviously thought
quite a bit about the rules!
for future reference, take a look at the first
NXTasy challenge.
A good challenge, and the author obviously thought
quite a bit about the rules!
November 28, 2006
NXT Videos
Since I haven't had much time for building lately, I thought I'd post
some links to nice NXT videos.
I've built a simple copier machine with the old Mindstorms. Here's a very nice plotter for the NXT: Click to watch.
A decent car that turns. Don't know why he added the music, though.
Click to watch.
Nice differential gear. Would be nice to see instructions for it. Click to watch.
This one has promise... Click to watch.
In the medieval weapons category we have ... Click to watch.
This motor-to-motor trick was always a fun demonstration with the old Mindstorms kit. Here we see it works with the NXT, too. Click to watch.
And here is my favorite NXT video! Click to watch.
Enjoy! Post a comment to say which is your favorite.
November 03, 2006
Bluetooth - Working for you?
Sorry - haven't had much time to build or blog.
So I'll post a question for you. Please answer with a comment...
If you have an NXT set and a Bluetooth device, can you get the two to talk to each other from the Lego NXT software ("NXT-G")? If so, please list the version of Windows or Mac you are running, and the type of Bluetooth device (with exact model number if possible). If you had to do something special to get it working, I'm sure the other readers would be interested to hear about it.
For me, the answer so far is no. I did get a very lengthy set of instructinos from someone (over 20 steps!), but haven't had time to try them yet.
October 09, 2006
NXT Parts List
BrickLink now has a parts list, with pictures, for the NXT (set 8527) here.
The catalog administrator there hasn't approved the parts list yet,
but I'm sure it's pretty close. BrickLink is a good place to pick up extra
Lego parts that you need. Check out the "Want List" feature. It's works
very well.
October 05, 2006
Spike .... Done!
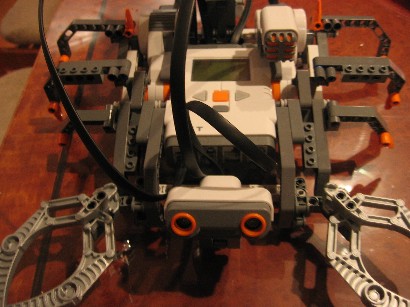 I finished the last two parts of Spike tonight.
When constructing, you might want to connect the cables before hooking the sensor assemblies to the main part of the robot. If you follow the instructions and wait until the last step, it is impossible, especially for the ultrasonic sensor.
First was adding the sound sensor. You can see it at upper-right in the picture. After programming, you clap and it will move. I had to lower the sound threshhold to make it more responsive, but it worked pretty well.
Then I added the ultrasonic sensor. The programming for this is a bit complicated, as the instructions zoom in a section, and you can't easily see where some commands go. Note that on your program, you can pan around with the pan toolbar button enabled.
Once I had the program corrected, it worked pretty well (and old Spike is not limping as badly today). If you move your hand in front of the sensor, it will (sometimes) strike at you. And meanwhile it avoids hitting walls, staying 30 inches (about 75 cm) away from them. It makes a sound when it strikes, but the speaker is not very loud, especially with the noise of the motors, so it is hard to hear.
Still, the most impressive bot so far.
October 04, 2006
Spike - Part 2 (with a tail... and a limp)
 Last night I was able to complete the second part of Spike, adding the tail. Construction was relatively easy, until near the end. Attaching the entire tail assembly to the robot base took some figuring out to determine where the attachment is made. And then connecting some of the wires is difficult once all the pieces are surrounding the base NXT. I think they could have done some more user testing to avoid issues like that with some minor re-designs, or re-arranging of instructions.
Still the tail action is impressive, how it bends down as the scissor mechanism extends. Quite clever. Unfortunately, my Spike does not travel in a straight line. It veers slowly to the right, so it never hits the ball that the instructions tells you to place in front of it on the test pad. No amount of checking if the legs are aligned helped on that score.
Have you gotten your Spike to go straight? How?
September 26, 2006
Spike - Part 1
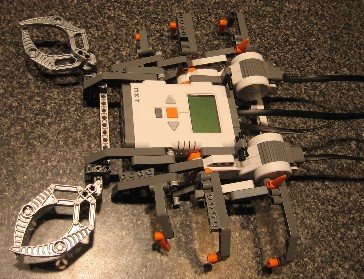 Over the weekend, I started on another NXT robot from the instructions included in the software. Say "hi" to Spike, the slightly disabled scorpion (I think). This is a the base - I haven't worked on the tail yet. The pinchers don't do anything, as they are fixed in the closed position, which is a bit disappointing. I can imagine Lego was a little worried about lawsuits when Spike might grab a kid's finger or something.
Anyway, it does crawl well on it's six legs. But these are not the legs obvious in the picture. Those are for show. The real crawling is done by smaller legs that are not so obvious. Look at the gray liftarm attached to a white liftarms. That's a leg.
The tail is next, and this robot promises to use the sound sensor, which I'm looking forward to trying out...
September 22, 2006
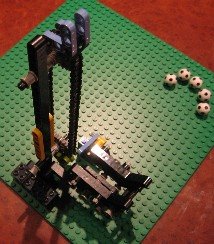
Ball Elevator - Part 2
 Continued on with the Ball Elevator grand contraption last night. As you can see, I have made some progress.
A motor has been attached to propel the elevator. For the moment it's just attached to a battery box - a rather convenient device. At some point I might need to control it all with an RCX, but I don't have a reason to use one at the moment.
At right is a close-up of the upper landing area for the balls. Catching the balls after being thrown by the little lift chairs is rather difficult.
 Anything that will catch the balls will likely get in the way of the chairs. After many attempts at something that would reliably, and if possible, elegantly catch the elevated balls, the result was very much like the hopper at the bottom. It's essentially three liftarms in parallel, with the one in the middle one stud lower then the outside ones. Some 2L thin liftarms (light blue) hold the two levels together. The middle liftarm sticks out a little closer to the chain. When the chair goes by, it fits between the two liftarms that make the chair. It took lots of placement adjustment to get that to work correctly.
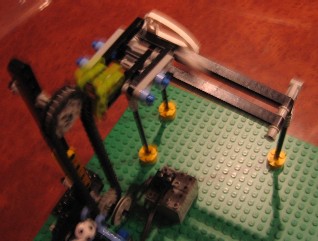 When the ball hits the end of this first ramp, it takes a right turn onto another ramp composed (for the moment, at least) of two longer liftarms.
The last pictures is a bad action shot. A blurry ball is making it's way down the longer ramp. Someday I'll make a setup for taking pictures with better lighter for faster shutter speeds. Or I could take the pictures during daylight. What a concept!
September 21, 2006
Ball Elevator - Part 1
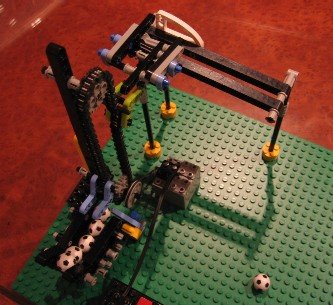
Haven't had too much building time the past few days, but I took a break from NXT learning to work on a ball elevator. I recently saw Philo's wonderful contraption, and from it, I stole the basis of the mechanism for lifting lego soccer balls.
I figured that with this idea, lifting the balls would be easy, but it was still a lot of work to get it working at all, and then to get it working consistently.
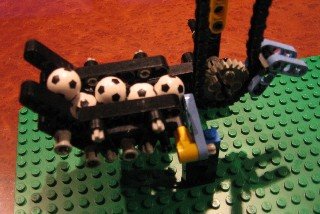 At right is a picture of the bottom of the elevator set to pick up the next soccer ball. Sorry the pictures aren't the greatest - I wanted to avoid using a flash and getting reflections and white spots. The chain is made of these, with a few of these interspersed. Note the blue liftarm. It keeps the balls from all rolling off when their is no "chair" ready to pick up a ball.
 Now a ball has been lifted. The stopper liftarm is lifted by the chair as it goes by. Getting that stopper mechanism working took five or ten attempts. The hard part is stopping the balls with something that doesn't hit the chain, or stop the chair's movement.
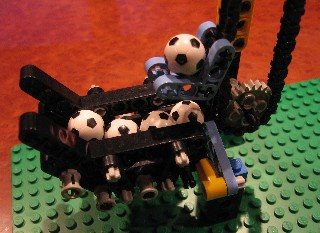 Now, at left, the ball has been lifted a bit, and the stopper liftarm will fall back into place just in time before the balls roll off onto the baseplate.
 Finally, here is a picture of a ball at the top of the elevator, just about ready to go over the top, and onto ... something that I haven't built yet! I think what I'm trying to build is called a Gravitron, but I can't find a good picture of one (not the amusement park ride - the thing they have in science museums).
September 20, 2006
Connector Converters? Extra Sensors? Rechargeable Battery
Questions for those who've got an NXT...
1) Have you tried the converters to use the old RCX sensors with the NXT? Do they work well? Do they work with the standard NXT programming system? Sounds like you need the educational version, and people are hoping that the retail software will get an update to allow it. Sigh...
2) If you had to buy one extra sensor for you NXT set, which one would it be?
3) Do you have the rechargeable battery and adapter? If so, is it worth the $73?
September 17, 2006
NXT Tribot Grabber
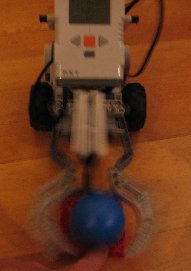
I went on to the next Getting Started step for the NXT tonight - the Grabber for the Tribot.
Builder is fairly straightforward, and the programming is to at this point.
But it didn't work. It tried to grab, but it couldn't hold the big blue ball. A little disappointing, but life goes on...
Well, I did finally figure out how to add pictures, so you can see the robot with the grabber, and its attempt to pick up the ball.
September 14, 2006
Added Bumper to Tribot
Last night I continued on with the getting started robot by
adding the bumper with the touch sensor. The bumer is a bit
bulky, but it does work pretty reliably. It's the first sensor
you add while building the Tribot. Interesting bumper design,
using a small gear to connect with the button of the sensor.
Want to add some pictures, but still getting used to my new
computer, so that will have to wait...
Programming is easy - adding one more block to the two I had
to move the robot forward, then back. It's essentially a "Wait Until"
block of old, but you wouldn't know that from looking at the block.
Maybe over time I'll get used to reading the programs by looking
at the blocks.
September 13, 2006
NXT Part Lists
Ah... Looks like the Mindstorms NXT (8527) parts list, with pictures, is already on Peeron.
NXT Parts List
Many of you, it seems, find this blog by searching for "NXT parts list".
Please add a short comment if you would like me to post the complete parts list
for the new NXT set (#8527).
Please add a short comment if you would like me to post the complete parts list
for the new NXT set (#8527).
September 11, 2006
USB Bluetooth Dongle
I should mention that the device I got was a Cables Unlimited USB-1530.
The USB-1520 is listed on a site as compatible with NXT, but it doesn't
say anything about the 1530. The only difference, supposedly, is the "class,"
that is, how far away you can communicate with the connected device.
the 1530 is Class 1 for 100m.
The USB-1520 is listed on a site as compatible with NXT, but it doesn't
say anything about the 1530. The only difference, supposedly, is the "class,"
that is, how far away you can communicate with the connected device.
the 1530 is Class 1 for 100m.
More attempts to connect to the NXT via Bluetooth
Partial success. Only had a little time tonight to play with the NXT.
Worked on getting Bluetooth communicating.
I uninstalled the driver that came with the dongle, and had Windows (XP)
install its own. That didn't help in itself. Going to the NXT window in the
Mindstorms software and doing a Scan, nothing connected.
Then I ran the Bluetooth application that came with the dongle,
and had it search for devices. Now it saw the NXT! It said
"NXT"! Many happinesses! On the NXT, it showed me the four-digit
passcode, which I entered in the application. It now showed an icon
for "NXT". More happinesses!
So I went back to the NXT window and tried Scan again.
After it's usual long delay, nothing.
Will try more soon...
September 10, 2006
I got an NXT!!
Finally got an NXT today! Went to the Lego Store, which was a madhouse because of a promotion they were doing in the mall. The person ahead of me at the cash register was also getting one. They didn't have the (expensive) rechargeable batteries in stock, and they don't carry the adapter (very weird - how do you charge the battery without an adapter?). But I walked away happily with my NXT.
Home later, I opened the box, which is a bit hokey. You have to tear the box flaps along a curve to get it open. One of the smaller boxes inside says "start here" but you really need to open many of the other boxes and at least three of the part bags.
The first model is the "TriBot" which isn't too hard to build. It is made with all three motors that hook together next to each other, but strangely, only two of them are actually used. The new phone pluggey wires are a bit bulky, and the ones they tell you to use (they come in three lengths, I think) are a little too long, and you have to figure out how to stuff them in so they don't trail behind the bot.
From here, things got a little confusing. First I tried programming the bot to the Quick Start instructions. These are not videos that take you step by step like for the old Mindstorms. They are step by step, but they don't always show you how you are supposed to accomplish a step, so it takes some hunting and guessing. After ten minutes or so I had the two-step program done.
I'd bought a USB Bluetooth dongle today, so I thought I'd try to use that to download the program to the NXT, instead of the USB cable that is included. There is no IR tower with the NXT. You use either USB or Bluetooth. After half an hour I gave up on Bluetooth without successfully connecting to the NXT. Very frustrating. Maybe I got a dongle that is not compatible. That would be an annoying waste of 25 dollars. So I switched to USB and that worked after a try or two.
The program just goes forward a couple feet on the test pad (which is a little nicer material than the old ones) and then goes bad. The instructions tell you to place one of the large balls on a certain spot, and they lead you to believe it's stopping when it gets to the ball, but it's really just going a certain distance (wheel rotations or time - not sure which) and then reversing.
One very frustrating part of the software (which installed very easily) was the NXT window that shows you connected NXT's (via either method). This would often lock up, sometimes for a few minutes at a time. Modern software should not do this.
All in all, there is good and bad for a first day's experience. I'm hoping for more consistent good news on further investigations.
September 06, 2006
Getting an NXT soon!
I hope to have an NXT set within two weeks.
I'll try to post more often once I get it, and get
time to try it out.
Any suggestions on accessories to get?
Or Bluetooth dongles for my new PC? Do I even need one?
I'll try to post more often once I get it, and get
time to try it out.
Any suggestions on accessories to get?
Or Bluetooth dongles for my new PC? Do I even need one?
August 25, 2006
No NXT yet - sigh...
Haven't posted much for two reasons....
First, it's summer. Doing too much outdoors.
Second, I don't have an NXT yet. Before I get one, I have to get a newer
PC. Mine is too old to run the NXT software. I'm hoping to get one soon,
and then get an NXT.
Then the postings will be fast and furious.... maybe!
In the meantime, if you have an NXT, please post some comments:
How do you like it in general?
How do you like the software?
How easy was it to learn to use?
Are there any books on the NXT out yet that are good?
Is the NXT easier or harder for kids to learn?
Include links to brickshelf or other pictures of projects you've made!
May 14, 2006
Great Ball Contraption (GBC) website
March 10, 2006
Who Wants an LPub introduction?
Just curious... Post a comment if you'd be interested in a short, practical introduction to getting started with LPub.
January 24, 2006
Mindstorms NXT Parts list
This picture, barely, shows the parts list for NXT.
January 06, 2006
Lego FAQ on Mindstorms NXT
January 05, 2006
Mindstorm NXT!
Wow! The new Mindstorms is here! Well, not until August, but it's been announced.
Mindstorms NXT. Soon you can buy a new control unit, motors and sensors.
Official Lego page
Articles at
Article with a good video
Excellent article about the people who helped design it
Mindstorms NXT. Soon you can buy a new control unit, motors and sensors.
Official Lego page
Articles at
Article with a good video
Excellent article about the people who helped design it
September 23, 2005
Open Thread
Post any questions or comment as a comment here.
![]()